Page 1 of 1

FIREFIGHTING CURRICULUM

Posted: Wed Apr 22, 2026 11:01 am
by Avine96
Image

SECTION 1: PERSONAL PROTECTIVE EQUIPMENT

Posted: Wed Apr 22, 2026 11:03 am
by Avine96
TRAINING BUREAU
FIREFIGHTER CURRICULUM
Chapter I: Personal Protective Equipment


INTRODUCTION

Chapter 1 will explain what completes your PPE and what each piece of equipment does to protect you. These pieces of equipment are listed in the order that you should put them on.

Each piece of your Personal Protective Equipment (PPE) or as we'll refer to it as "turnout gear" is crucial to providing both fire suppression and rescue services. The entire ensemble is designed to protect you from direct contact with flames, steam, smoke, and/or sharp edges. This equipment is provided to you for your personal protection and should never be neglected.

TURNOUT BOOTS & PANTS

When your gear is issued to you, you will need to place your boots inside of your pants. Once you step into your boots, pull your turnout pants up to your waist by the waist on the pants. At this point, you will clip the pants as well as press on the velcro at the groin, and then pull your suspenders over your shoulders. Your equipment is measured to you, ensuring a proper fit every time you put it on.
SpoilerImage
NOMEX HOOD

Your hood should go on second to ensure it's secured underneath your turnout jacket. The hood slides over your head and sits on your head once it's placed on properly. The hood is made of a material known as Nomex; a heat-resistant material that is perfect for firefighters as there's enough excess to cover your neck and ears.
SpoilerImage
TURNOUT JACKET

Your Turnout Jacket should be placed over your torso and worn as you would any other jacket or coat. Once it's on your body you'll then clip the four clips and press down on the velcro. This will protect your torso and arms from burns or cuts.
SpoilerImage
SELF CONTAINED BREATHING APPARATUS (SCBA)

Your SCBA is an extremely important piece of equipment for you to use. The SCBA consists of the harness and cylinder. The harness has all of the necessary equipment for reducing the pressure in the cylinder to come out of your regulator at a SIGNIFICANTLY reduced pressure, but more importantly your integrated PASS device. The PASS device is a pneumatic based piece of equipment that turns on once the harness assembly has air in the system and continues to operate until the assembly is drained of air, or the batteries die. Your PASS can be set off in two manners:
  1. Passively: Should you stop moving for more than 30 seconds your PASS device will go through two stages before reaching its third and final stage known as "FULL ALARM." To disable this alarm, you'll need to deactivate it via the command console.
  2. Manually: Should you need to manually activate your PASS device you can do so on the command console via the RED button. To disable this alarm, you'll need to deactivate it via the command console.
Your SCBA operates as an on-demand system, meaning that air will only enter your mask when you take a breath making negative pressure within the mask. The air that is in this system is room air and not pure oxygen.
SpoilerImage
HELMET

Your helmet is worn on your head, on top of your hood. The purpose of this piece of equipment is to protect you from falling debris as well as hot water. The BCFD issues firefighters with a composite traditional firefighting helmet of either the EV1 or Ben 2 Lowrider. Personnel are allowed to use their own purchased helmet so long as it is the following:
  • NFPA Compliant;
  • Colored accurately; and
  • Permission has been received by an Officer.
  • Yellow Helmet = Operations Staff;
  • Orange Helmet = Line Officers; and
  • White Helmet = Chief Officers.
SpoilerImage
GLOVES

The last piece of equipment to go on will be your gloves. Your gloves are designed to protect you from steam/heat burns as well as smoldering materials that may be touched during fire attack or overhaul operations. Your gloves limit your dexterity significantly hence why they are to go on last.
SpoilerImage

SECTION 2: APPARATUS FAMILIARIZATION

Posted: Wed Apr 22, 2026 11:03 am
by Avine96
TRAINING BUREAU
FIREFIGHTER CURRICULUM
Chapter II: Apparatus Familiarization


INTRODUCTION

Chapter 2 will be outlining the most basic Fire Suppression apparatus that is utilized by the Los Santos County Fire Department: The Engine Company.

Due to staffing issues, the Blaine County Fire Department does not operate strictly Engine Companies, however, the department operates a "Rescue Engine" concept which allows for the department to handle a larger variety of incidents with fewer resources required to be on a scene to ensure its stability and success.

FIRE SUPPRESSION LINES

The engines utilized by the BCFD operate four hose lines for the purpose of Fire Suppression:
  • Bumper Line
    • SpoilerImage
  • Cross Lay #1, #2, and #3
    • SpoilerImage
Your Bumper Line will be pulled on all vehicle fires and any structural fires that are within 100' of the fire apparatus. Your Cross Lays vary in lengths and sizes however these are the primary hose lines to be utilized on your structural fires.

DRIVER SIDE COMPARTMENT A

On the driver side, the first compartment on the body of the truck belongs to that of your EO or Engineer Operator commonly referred to as your "driver". All of their equipment, as well as necessary fittings for various different hose diameters, are in this compartment, allowing them to successfully complete their job which is to pump the apparatus.
SpoilerImage
DRIVER SIDE COMPARTMENT B

This Compartment consists of all of your equipment for Forcible Entry as well as Highrise Operations.
SpoilerImage
On the top of the compartment is a pull-down tray that holds a 150' 2.5" hose line as well as a water thief. Along with this equipment, firefighters will need to grab a 2.5" Nozzle and Highrise Bag.
SpoilerImage
At the bottom of this compartment is all of your forcible entry equipment:
  • Halligan Bar;
  • Flat Head Axe;
  • The Pig;
  • Denver Tool;
  • K-Tool; and
  • Pick Head Axe.
SpoilerImage
DRIVER SIDE COMPARTMENT C

The last compartment on the driver side of the apparatus contains all equipment relating to high-pressure airbag operations as well as vehicle extrication.

Your airbag equipment consists of the air-bag controls in the black box as well as 6 various different lifting bags.
SpoilerImage
Your extrication equipment is located on the bottom pullout tray and consists of the following:
  • Glass Master Hand-Saw;
  • 10,500 PSI Power Unit;
  • Cutter;
  • Spreader; and
  • Long & Short Rams.
SpoilerImage
SpoilerImage
SpoilerImage
OFFICER SIDE COMPARTMENT A

The first compartment on the Officer side of the vehicle is your RIT/Lighting Compartment. This compartment will hold all necessary lights for overhaul as well as connections to plug the lights into a junction box for power. Your RIT equipment consists of the following:
  • RIT Pack;
  • RIT Bag;
  • RIT Search Bag; and
  • RIT Safety Lamp.
OFFICER SIDE COMPARTMENT B

Compartment B on the Officer Side contains bolt cutters as well as equipment for operating your Rescue Struts for a vehicle that is on its side and/or roof.
SpoilerImage
OFFICER SIDE COMPARTMENT C

The final compartment on the Officer side of the apparatus is your ventilation compartment. This compartment contains your saws, fans, and fuel necessary for ventilating in both horizontal, vertical, positive, or negative pressure means.
  • Chainsaw (x1);
  • Partner Saw (x1);
  • Gas Fan (x1);
  • Electrical Fan (x1)
  • 50:1 Small Engine Fuel (x4); and
  • 4 Cycle Engine Fuel (x1).
SpoilerImage
APPARATUS REAR

The rear of the apparatus has two primary features. The hose bed as well as ground ladder/hook storage (both pictured below).

The hose bed consists of the following hoses and diameters:
  • 5" @ 825'
  • 3" @ 300'
  • 2.5" @ 200'
SpoilerImage
The apparatus carries the following ladders and hooks:
  • Ladders:
    • 24' Extension Ladder (x1);
    • 14' Roof Ladder (x1); and
    • 10' Attic Ladder (x1).
  • Hooks:
    • 8' Pike Pole;
    • 6' New York Hook; and
    • 6' Pike Pole.
SpoilerImage

SECTION 3: PUMP OPERATIONS

Posted: Wed Apr 22, 2026 11:04 am
by Avine96
TRAINING BUREAU
FIREFIGHTER CURRICULUM
Chapter III: Pump Operations


INTRODUCTION

The one thing that occurs at every fire regardless of if you arrive on the first engine, second engine, a ladder truck, or on the ambulance as EMS stand-by is a fire attack. Every fire a hose line is stretched on the fire ground for the purpose of fire suppression. Pumping is often seen as a "support" role, however, without proper pumping fire suppression cannot take place. Your basic pump operations will revolve around fire suppression in an operational role rather than a support role.

This guide will provide you with the information necessary to pump fire apparatus at both a basic as well as advanced level covering basic fire attack pumping as well as water supply operations as an operation rather than a support role. Terminology in this section is a necessity and steps must be followed methodically to ensure operational success.

"Do you want the fire to go out, or do you want to put the fire out? That's the difference between pressure and volume." - Unknown.

BASIC PUMP OPERATIONS

The BCFD suppression apparatus operates two types of hose lines 'pre-connected' and 'static'. Pre-connected is exactly what you read, the hose is already connected to the truck in some capacity (this hose will include your bumper line, crosslays, or booster reel). The static hose is a hose that is not connected to the apparatus. You will have to manually pull this hose off of the apparatus and connect it to discharge or intake prior to operating it (your static hose lines will be located on the hose bed).

Your steps for setting the apparatus up for pumping are as follows:
  1. Engage the parking brake;
  2. Put the truck into neutral;
  3. Shift the truck into pump gear; and
  4. Put the truck in drive.
Your steps for pumping a handline are as follows:
  1. Deploy the hose line;
  2. Set your pump discharge to 120 PSI; and
  3. Pull the discharge valve for the appropriate discharge.
Once you've begun pumping water out of your apparatus you'll need to replenish the water being used, otherwise, you'll run your tank dry. Your supply line is located in the hose bed and will be the primary hose used for pumping to the primary suppression apparatus.

Your steps to connect your truck to a hydrant are as follow:
  1. Pull your 5" supply line off of the hose bed;
  2. Grab your hydrant bag;
  3. Drag the hose over to the hydrant (should it be a short distance connect the hose to the master intake valve);
  4. Use your hydrant wrench to take off your main steamer cap;
  5. Use your hydrant wrench to turn on the hydrant and flow water out of the hydrant until it's clear;
  6. Use your hydrant wrench to turn off the hydrant;
  7. Connect your hose to the hydrant; and
  8. Turn the hydrant back on.
  9. OPTIONAL: Partially open your tank fill.
ADVANCED PUMP OPERATIONS

This section of the guide will have to do with more logistical details of how different types of pump operations take place from different hose line pressures to foam operations.

One major thing that this section of the guide will cover is Gallons Per Minute (GPM) or "gallonage" and Pressure measured in PSI (pounds per square inch). The number of GPM's you put on the fire is what puts it out. Anyone can spray water on a fire at 120GPM, only a trained individual will realize that it'll take 125GPM to put the fire out. Every hose line unless it's using the same hose diameter, length, and nozzle will have to be pumped differently. Different diameters require a different pressure, different nozzles require a different pressure all in the name of achieving an adequate "flow" or an appropriate number of GPM to extinguish a fire.

FRICTION LOSS

Friction loss is the pressure that is lost in a hose line due to contact with the interior of the hose line on it's way to the nozzle. There are many factors that play into friction loss including primarily the following:
  1. Hose Diameter: The smaller the size of the hose the more friction loss. A 2.5" hose line will have LESS friction loss than a 1.75" hose line;
  2. Appliances: Gated Wyes will cause you to lose 5 PSI; and
  3. Elevation: Every floor you pump within a structure above 4 stories will cause 5 PSI friction loss per floor.
SpoilerImage
HANDLINES

The BCFD utilizes four preconnected hose lines, below are each hose line, its length, and the pressure it's pumped at.
  • Bumper Line: 100' of 1.75" hose line pumped @ 118 PSI;
  • 1st Crosslay: 150' of 1.75" hose line pumped @ 101 PSI;
  • 2nd Crosslay: 200' of 1.75" hose line pumped @ 118 PSI;;
  • 3rd Crosslay: 200' of 2.5" hose line pumped @ 86 PSI; and
  • Booster Reel: 200' of 1" hose line pumped @ 200 PSI.
NOZZLES

There are two types of nozzles utilized by the BCFD and each nozzle has it's placed as well as its purpose:
  • Automatic Fog Nozzle: This nozzle is considered a highly versatile nozzle primarily for car/garbage fires however it's commonly utilized for interior firefighting operations. This nozzle grants you the ability to operate a narrow stream referred to as a "straight stream" or a wide fog pattern referred to as a "fog stream". The pressure for this nozzle is set at the pump panel, it operates by a set of spinning teeth at the tip of the nozzle which turns as water passes through it causing the water to be cut up into tiny droplets of water. These nozzles commonly have to be operated with a pressure of 100 PSI at the tip, this is used on the bumper and booster lines; and
    • SpoilerImage
  • Smoothbore Nozzle: A smooth bore nozzle is used predominantly in the North Eastern region of the United States for interior firefighting primarily based on its scientific backing due to it operating as a "solid" stream, this means that the water comes out of this nozzle as a solid cylinder. Once it makes contact and breaks up its water droplets are larger than that of the fog nozzle meaning it absorbs more heat resulting in a more direct and effective fire attack. These nozzles commonly have to operate with a pressure of 50 PSI at the tip, this is used on all crosslays.
    • SpoilerImage
WYES

A wye is a device that allows you to add lines to an existing hose line. The purpose of this is to for example take a 3" or 2.5" hose line and split it off into two smaller hose lines, for example, two 1.75" hose lines. The only downside to a wye is that you have to be downsizing into two identical hose lines. They have to be the same length, diameter, and the same nozzle otherwise you'll be over-pumping one hose line. Your pressure for pumping on a gated wye will be as follows:
  • Nozzle: Your minimum pressure will be 50 due to the operating pressure of a smooth bore nozzle;
  • 3 Inch: For every section of 3" you use during a wye operation you will add 4 PSI;
  • Wye: You will automatically add 5 PSI; and
  • 1.75 Inch: For every section of 1.75" you use during a wye operation you will add 17 PSI.
    SpoilerImage

    A breakdown of this chart:
    • Nozzle Pressure: Your nozzle pressure is always 50 PSI;
    • 3 Inch: In this example, your PSI for your 3" is 12 PSI meaning you have 150' of 3" due to it having a psi of 4 PSI per 50';
    • Wye: You'll add 5 PSI per wye, in this case, we're using one; and
    • 1.75 Inch: Your PSI for your 1.75" is 34 PSI meaning you have 100' of 1.75" due to it having a psi of 14 PSI per 50'.
    50+12 = 62
    62+5 = 67
    67+34 = 101
DELUGE GUN

Your Deluge Gun referred to as a "deck gun" is the large cannon-like object that's located on the top of the pump on your engine. Your discharge pressure for your Deck Gun is very straight forward. You can consistently pump your deluge gun at 80 psi and you'll never go wrong.
SpoilerImage
FOAM OPERATIONS

Foam operations can be difficult however they're very straightforward. Inducting foam operations are pumped as you normally would, foam that is being educted is pumped at 200 PSI @ 95 GPM at the eductor. Foam operations must be done via a fog nozzle or a foam nozzle.

Class A Foam Operations will be done via the foam system built into the pump panel as our Class A foam is kept in a small 50-gallon foam tank on the truck and is mixed internally.

Class B Foam Operations will be done via eductor operations where your foam is siphoned out of the foam bucket into the hose line by the negative pressure produced as water is pumped out of a discharge on the pump panel. Steps to performing eductor operation are as follows:
  1. Connect your foam eductor to your discharge as well as place your tube into your Class B Foam Bucket;
  2. Connect your hose line to your discharge;
  3. Charge line at the correct pressure; and
  4. Once the line is pumping, turn the dial on eductor to select a percentage from 3-6%.
SpoilerImage

SECTION 4: ENGINE COMPANY OPERATIONS

Posted: Wed Apr 22, 2026 11:06 am
by Avine96
TRAINING BUREAU
FIREFIGHTER CURRICULUM
Chapter IV: Engine Company Operations


INTRODUCTION

Chapter 4 will cover the bread and butter operations of firefighting, that being the job of the engine company. Without extinguishment, the fire will burn until it either runs out of fuel, oxygen or can no longer supplement heat. The role of the engine company is to facilitate aggressive and direct extinguishment achieved through aggressive interior firefighting to ensure as much property is saved as possible.

"If you put the fire out right in the first place, you won’t have to jump out the window" - Lt. Andrew Fredericks FDNY

ENGINE COMPANY INFORMATION

Your role as an engine company is dependent primarily on in what order you arrive on the scene. Any firefighter on the scene can put water on the fire, but being able to do it methodically, properly, and efficiently is what separates a firefighter from a good firefighter. Engine companies by definition as the companies responsible for carrying the hose and water to the scene. These crews are trained and disciplined in stretching hose lines, interior firefighting, nozzle discipline, and extinguishment.

As the 1st engine company on the scene of a fire, you're responsible for putting the "first line" in place to begin extinguishment. Forcible entry if necessary can be achieved by the engine company as it will facilitate the job of the engine company; extinguishment. The most consistent and important thing to happen at any fire scene regardless of if it's down the street, across the river, or the 100th of your career - A hose line is always placed in operation for the purpose of extinguishing the fire. No other hose lines should be put in operation until the first hose line is placed in service and operational.

As the 2nd engine company on the scene of a fire, you're responsible for establishing a water supply to the 1st engine company. Whether it be a forward lay, or reverse lay unless the driver of the 1st engine company says he has water supply covered you will be responsible for making that connection from the hydrant to the 1st engine company's intake.

METHODS OF FIRE ATTACK

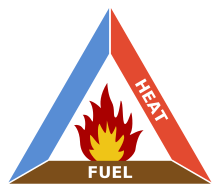
There are three methods of fire attack which will all be explained below in as much detail as possible. In order to understand these methods of fire attack and why they're used, you must understand the "fire triangle". The fire triangle consists of three parts:

Image

If you can take away one side of this triangle, you will extinguish a fire. Whether it's cooling the fire, using foam to eliminate oxygen, or removing/cutting off the fuel source.

There are three types of attacks:
  1. Direct Method (Offensive Attack): This method of fire attack involves direct application of water on the burning fuel to cool it below its ignition temperature. Most commonly in order to achieve this method of attack will result in going inside of the structure as you will rarely be able to do so from the exterior. The direct method of fire attack should only be completed via a solid stream (smoothbore) or straight stream (fog nozzle);
  2. Indirect Method (Defensive Attack): Your indirect method of fire attack will take priority when your scene is not safe enough and/or structure unstable enough to safely and efficiently perform a direct method of fire attack. In order for this method to be the preferred one, the fire must be very well developed since fires in the early stages are best suppressed using the direct method of fire attack. Deck Gun/Elevated Master Stream operations are encouraged during this method of fire attack; and
  3. Combination Method (Transitional Attack): In a fire that is reaching majority and/or full development it may be best to "reset" the fire by starting off a Defensive Attack and once enough fire has been knocked down 'sweeping up' the remains via a direct method of attack. This method of fire attack is encouraged when there's a heavy amount of fire, yet the structure is still stable enough to enter despite fire load.
WATER SUPPLY

Your hose line is your lifeline inside of a burning structure, without adequate water to put out a fire you'll never be able to put out a fire. In order to ensure that you have enough water to extinguish a fire, you'll need to secure an adequate water source to supplement your water usage. Water supplies occur in two forms:
  1. Static (hydrants, etc.); and
  2. Variable (dump tanks, etc.).
As noted above during Chapter 3 you have your steps for hooking up to a "static" water source AKA a fire hydrant. However, we do have areas within our territory where laying in the supply line to the fire is not a viable or possible option. This is where the "variable" water sources become king. Your variable water source comes in the form of a dump tank, a tanker, or even another fire apparatus.

A dump tank operation involves tankers dumping their water into these portable "pools/tanks" and an engine company drafting water out of these pools and pumping it either to another apparatus or to hose lines. The other option is to discharge your water from your tank directly to another apparatus.

SECTION 5: TRUCK COMPANY OPERATIONS

Posted: Wed Apr 22, 2026 11:07 am
by Avine96
TRAINING BUREAU
FIREFIGHTER CURRICULUM
Chapter V: Truck Company Operations


INTRODUCTION

Chapter 5 is going to cover your more specific roles on the fire ground should you have the luxury of a Ladder Truck or an additional Company on scene assigned these fire ground tasks. Your truck company does not have a water tank or any hose, it is responsible for the tasks listed below. The role of your "truck company" is not directly related to fire attacks but the following tasks that can be completed in any order. To start off we'll talk about truck company roles in a Residential and Commercial setting prior to covering these tasks:
  • Ladders;
  • Overhaul;
  • Ventilation;
  • Entry;
  • Rescue; and
  • Salvage.
TRUCK OPERATIONS

Your truck company in a residential setting may be required to supplement fire attack by assisting the engine company, however, in a commercial setting, your truck company will have tasks that need to be completed to successfully facilitate fire attack.
  • Residential Fire: Most of the time the job of your truck company on a residential fire will be conducting a search to ensure that the building is unoccupied prior to opening up walls and ceilings to expose the fire for the engine company. Ventilation on residential fires is not a requirement on every fire and is dictated by interior conditions; and
  • Commercial Fire: At a commercial fire your truck company has three major jobs to complete in succession to one another. Entry, Search, and Overhaul. Most commercial structures have doors constructed of metal along with the frames making them less susceptible to opening without ease. Your commercial building depending on the time of day has a higher chance of being occupied and more heavily occupied than that of your residential home. Then overhaul is important as most commercial structures have void spaces in the ceiling that can spread quickly through a strip center or row of businesses.
LADDERS

On fire scenes specifically that of more than one story, your ground ladder placement is important. Firefighters assigned to either RIT (Rapid Intervention Team) functions or the "outside vent" firefighter should take the time to place a ground ladder at every window that is on the second floor and higher when viable. Commercial structures such as a midrise or highrise will not allow you to place a ground ladder to the upper floors. However, these ladders allow for firefighter egress should they need to bail out of a window, as well as entry points for Vent-Enter-Search (VES) operations, and exits for occupant rescues.

Apparatus placement of the truck company should always be direct in front of the building if not on the corner of the building allowing the aerial to reach two sides of the structure. The engine company has the luxury of extending its hose lines, the truck company does not have the luxury of extending the length of it's aerial.

Truck 1 has a complement of 344' of Ground Ladders they are broken down below:
  • 2x - 35’ 2-Section Extension Ladders;
  • 2x - 28’ 2-Section Extension Ladders;
  • 2x - 24’ 2-Section Extension Ladders;
  • 2x - 18’ DR Roof Ladders;
  • 5x - 16’ DR Roof Ladders;
  • 1x - 14’ DR Roof Ladder;
  • 2x - 10’ Attic Ladders; and
  • 1x - 20’ Little Giant.
OVERHAUL

Overhaul is the act of exposing structural members or void spaces to check for "hidden fire" or smoldering embers. This can be done by opening up floors, walls, and ceilings with a variety of hand tools from axes, halligans, hooks, saws, or any striking tool. This is vital to be completed by firefighters to ensure that the fire has been extinguished and there are no smoldering embers hidden that could allow the fire to rekindle hours later.

VENTILATION

Ventilation is a touchy subject primarily because there's a belief that it must be done at every fire, specifically vertical ventilation. Both vertical and horizontal ventilation will be discussed as well as when and why to use them, however just because a building is on fire does not mean you need to cut a hole in the roof, sometimes cutting a hole isn't even an option. Ventilation is determined by the path the smoke takes to EXIT the structure.
  • Horizontal Ventilation is achieved by opening/removing doors and windows. You can also supplement this by utilizing a fan at any entrance or exit in a positive or negative pressure act. On residential structures and most commercial structures, you will want to utilize positive pressure by pointing the fan inward. Midrise/Highrise structures horizontal ventilation will be your only method of ventilation if the third floor of a five-story building is on fire putting a hole in the roof will achieve nothing; and
  • Vertical ventilation is inherently dangerous, however, it's one of the skills that can set apart an average truck company and a great truck company. The reason for going up on the roof of a building that is on fire is to directly remove the fuel from the building. Heated gases have a tendency to rise, by putting a hole that is 16 square feet in the area above the fire room you will allow for that heat, smoke, steam, and fire to exit the fire room creating immediate positive condition changes for the firefighters on the interior but also any victims inside. Vertical ventilation is highly encouraged to be something commonly trained on and not to be used on every fire unless necessary. Knowing how, when, and where to cut your hole is the difference between how dangerous it will be for the crew operating on the roof.
ENTRY

Entry has many different meanings. The truck company is responsible for ensuring that entry is made to the structure whether it be through your irons or a saw. Any time you're forcing a door open you will be utilizing your irons or your halligan bar and flat head axe. If it's a garage door or loading dock door you'll utilize a rotary saw (K-12/Partner Saw) to open up the door.

Without getting the building opened up, we cannot facilitate our aggressive interior fire attack.

RESCUE

Rescue can be connected to either civilian or firefighter rescue. This is under the truck company section due to the search assignment being the job of the truck company, however, rescue is the responsibility of every firefighter on the scene. Whether it be finding a civilian or rescuing a downed firefighter we are all responsible for removing anyone who is found during any stage of the fire that is a viable and saveable victim.

YOU DO NOT NEED TO REMOVE A VICTIM FROM WHERE YOU ENTERED IF YOU'RE BY A WINDOW TAKE THEM OUT THE WINDOW SHOULD YOU HAVE A LADDER AT IT!
  • Primary Search: Searching for life is one of the most important roles of the truck company, initially, you'll be given the task of a primary search. Your primary search is a very quick and fast search not only for victims but also to locate the fire for the engine company if they have not found it. Your search will begin on your way to the seat of the fire, should you find someone who removes them. But your search will "start" at the seat of the fire and you'll work your way back to the exit. This is once again a very quick search, checking behind doors, identifying windows, etc.;
  • Secondary Search: Your secondary search will begin at the area you enter from and is slow and methodical checking in detail areas within the structure. This can occur after the primary search has been completed and typically after fire attack but before overhaul begins;
  • Vent-Enter-Search (VES): A well known and utilized method of searching and compartmentalizing is your VES method. It's commonly used when a homeowner or someone can say "They are located at X" or if you have a few fighters on the exterior they can throw ladders or make entry to uninvolved rooms via the window. Once you have made access to this room you will find the door to the room and close it. At this time you will search the room and come back out of the window. This can be done a multitude of times on a scene, but once a room is searched that's it;
  • Civilian Rescue: Civilians will be the vast majority of individuals that you will remove from structures during your career. Make it a point to search behind doors, under beds, in closets, bathtubs, showers, anywhere that you could hide you'll need to check. People will do anything to avoid smoke or fire; and
  • Firefighter Rescue: Should you be responsible for rescuing a downed firefighter you'll need to do the following things to ensure they're properly extricated:
    1. Should their PASS device be going off, turn it off;
    2. Establish contact with the firefighter. Determine if they're alert, if they're breathing, or if they're injured; and
    3. Begin preparing them for extrication. Life over limb here, if they have a broken back or neck they're better off with a broken leg outside than they are with one inside of a fire.
SALVAGE

Your least important task will be Salvage, now this list of "LOVERS" is not in order of priority but rather an acronym to remember the tasks of your truck company. These tasks are to be completed in order of what needs to be done at the time.
However, ensuring items within a home are saved and/or not damaged is not the focus during fire suppression operations. During the overhaul process, salvage can begin to take place.

SECTION 6: RESCUE COMPANY OPERATIONS

Posted: Wed Apr 22, 2026 11:07 am
by Avine96
TRAINING BUREAU
FIREFIGHTER CURRICULUM
Chapter VI: Rescue Company Operations


INTRODUCTION

Rescue operations within the BCFD cover firefighting activities that can be completed by any member. Rescue implies that the patient(s) are viable rescues as their life can still be saved. We will discuss vehicle extrication as well as Rapid Intervention Team operations below.

VEHICLE EXTRICATION INTRODUCTION

A motor vehicle accident or "MVA", is an incident that involved a motor vehicle (car, motorcycle, etc). MVA's have numerous different risks involved in them and there is no "textbook MVA" due to the different variables.
  • Vehicle Construction: Most vehicles are created of a very thin layer of steel or aluminium, while this is good for keeping cost down, it allows the vehicle to crumble and crush more. A wreck that may appear bad may be harmless to the occupants, the presentation of your patients determines how bad an accident is, not how the vehicles appear. Vehicles are designed to crush to absorb as much energy from the impact as possible;
  • Posts: At a minimum, your vehicle will have 3 "posts" possible 4 or more depending on how many doors it has. The post is the arm of metal that extends from the body of the vehicle to the roof of the car. Should you be required to peel the roof back or remove the roof entirely, it's important to know where these are located. Most styles i.e. sedans are consistent in placement and quantity as you can see in the image below.
    • SpoilerImage
  • Battery: Every vehicle has a battery, your battery is responsible for powering all electronics within a vehicle. The engine of a vehicle cannot turn on without the battery connected. Any time you will be using extrication equipment on a vehicle it is important that you disable the battery as soon as possible for a multitude of reasons:
    • Disarming non-deployed airbags; and
    • Patient/Firefighter safety.
    A majority of vehicles will have their battery located in the hood of a vehicle, modern cars such as Tesla have their batteries located in the trunk.
VEHICLE EXTRICATION SAFETY

Ensuring that the scene of a vehicle extrication is safe is the first and very important step that needs to be completed on every extrication. Ensuring that the vehicle will not move by cribbing it as well as ensuring there are no dangerous leaks are vital for firefighter and patient safety.
  • Smoke/Fire: If you arrive on the scene to a vehicle that is smoking the bumper line must be deployed and charged. Should the vehicle catch fire one firefighter will focus on extinguishment while another firefighter focuses on rapid patient extrication, in this case, life over limb is more important for the patient. Any possible neck or back injury must be overlooked for the end goal of saving their life;
  • Leaks: Before you can stabilize a vehicle you will need to check the vehicle for any leaking fluids. Any fluid on the ground needs to be covered with absorbent because, despite most fluids not being a fire hazard, they're inherently slick and slippery. Extrication tools at the minimum weight of 40 pounds, we are not here to add to the number of patients; and
  • Securing the Vehicle: Vehicle stabilization can be achieved via two types of equipment: cribbing and rescue struts:
    • Cribbing is to be utilized when a vehicle is on its roof or wheels and is not stable. Any vehicle that has the potential to roll or move during any period of extrication until it is towed needs to be stabilized. Cribbing can be placed underneath the frame of a vehicle most commonly under the body of a vehicle just in front of the tire as the frame is the strongest part of the vehicle; and
      • SpoilerImage
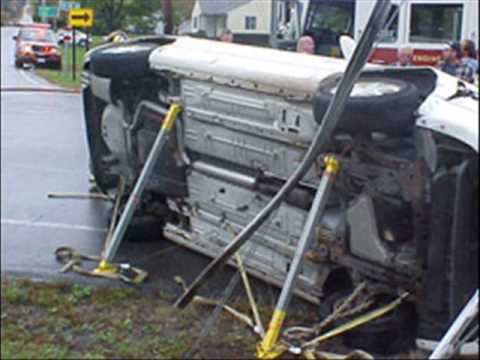
    • Your rescue struts will be utilized exclusively when a vehicle is on its side rather than upside down or upright. Struts work by extending to the vehicle up high and then using chains or ratchet straps down low on the vehicle to pull the vehicle and the strut together creating one object with a low center of gravity.
      • SpoilerImage
    VEHICLE EXTRICATION EQUIPMENT

    As a firefighter, you'll have access to edraulic equipment which is a line of battery-powered equipment allowing you to take your equipment as far from the truck as necessary without the complications of hydraulic hose lines or a power unit. It's important to note that with these tools you're not removing the patient from the vehicle, but removing the vehicle from the patient.
    • Spreaders: Your spreaders are used for pushing metals away from one another to expose a purchase point on a vehicle to use your cutters. For example, spreading the driver and rear passenger door apart to expose the Nader pin, or crushing the front fender to expose your driver door hinges;
      • SpoilerImage
    • Cutters: Your cutters are a pair of scissors on steroids, some serious steroids. These "scissors" are capable of cutting through the frame of a vehicle if necessary (it won't be) which is the strongest part of any vehicle manufactured regardless of brand or year produced.
      • SpoilerImage
    • Ram: Your ram should you need it is responsible for pushing things apart, it's critical use will be during dash rolls or dash lifts.
      • SpoilerImage
    RAPID INTERVENTION TEAM OPERATIONS

    Your Rapid Intervention Team or "RIT" team is your group of firefighters who are dedicated and on standby in case that a mayday or downed firefighter is reported inside of a structure. An RIT team is not mandatory for any incident, however, it is highly recommended at operations.

    EQUIPMENT

    Equipment for an RIT team is really endless, there's no real "SET" list of equipment for RIT operations because every structure is different. Your RIT team will be responsible for ensuring that entry and exit doors are forced open, burglar bars are removed from windows, ground ladders are thrown to windows, and that they have any possible equipment necessary for RIT operations. The only designated list of equipment is below:
    • RIT Pack:
      • 60 Minute SCBA Bottle;
      • RIT Mask;
      • Door Chocks; and
      • Multi-tool (Spanner, Gas shutoff, & Wire Cutters).
    • RIT Bag (used for searching large commercial spaces):
      • 200' of search rope in a bag; and
      • 4x - 50' Tag Lines.
    • RIT Safety Lamp:
      • Piece of equipment placed at the entrance of a structure any time the RIT team is activated;
      • Has a blinking light that signals the exit of a structure; and
      • Has a "screeching" like sound which will be turned on in the case of a mayday situation.
    Tools and equipment for RIT operations are entirely dependent on the circumstances, however, it's recommended to have a set of irons, a hook, and a saw on standby.

SECTION 7: BACKDRAFT & FLASHOVER

Posted: Wed Apr 22, 2026 11:08 am
by Avine96
Training Bureau
FIREFIGHTER CURRICULUM
Chapter VII: Backdraft & Flashover


INTRODUCTION

During a fire, two types of events can occur: a backdraft and a flashover. This chapter shall go over what a backdraft and a flashover is.

FLASHOVER

A flashover occurs during the end of the "growth" stage of a fire when it's reaching "fully developed". At this stage of the fire most if not all of the contents within a room/structure will rapidly ignite causing atmospheric temperate within the room to reach anywhere from 1,000°F to 1,500°F. Enduring heat at this temperature will quickly cause any gear to fail and will cause burns to any individual within the room regardless of gear.

Your flashover is commonly misunderstood for a backdraft that is completely different. Your flashover is when a room and all of its contents have reached their "ignition temperature" meaning, for example, the entire room is on fire. When these items ignite it's not from direct flame contact but actually due to these items i.e. couches, plastics, or synthetic items giving off a flammable vapor. This vapor ignites causing the material (AKA Fuel) to ignite.

BACKDRAFT

Your backdraft is the rapid reignition of an area that has become oxygen-deprived. A closed off or compartmentalized fire will burn until all of its oxygen has been used completely. The oxygen is removed from the equation of "Heat + Fuel + Oxygen = Fire'' which causes the fire to go out. However, once Oxygen has been added back in through the process of opening a door or window the fire triangle is completed causing the fire to rapidly reignite. Due to the building being pressurized from the smoke the pressure exits the structure through the path of least resistance which was the opening that allowed oxygen in, i.e., opened door/window.

The smoke acts as fuel and, as the room is already hot, a backdraft will trigger as soon as new oxygen enters. This can only happen if the area has been filled with sufficient amounts of smoke. A backdraft will generate a shockwave, which can vary in strength. The area which was previously filled with smoke can reignite due to the new oxygen and the heat from the explosion. Backdrafts can be a firefighter's worst nightmare, which is why providing ventilation is extremely important to let smoke escape and to let a fire breathe.